Tools I use for scientific code development
In my daily job as a scientific code developer, I use a lot of freely available tools that help me be more efficient and to produce more robust, reproducible science products. In a series of blog posts, I will try to provide an overview of the most important of these tools. I will give the names of the specific software I use, but I will also try to keep my descriptions more generic, focusing on a general description of the concept of that specific tool, rather than a detailed description of the many features of the specific implementation I use.
This first post will focus on tools that involve the development phase of a scientific software project. These are tools that help to write and document, compile and debug, and format and save code.
Code writing
Qt Creator
An important tool for anyone writing code is a place to actually write code: a text editor. An even better place to write code is an Integrated Development Environment or IDE. This is in essence a text editor, albeit with a wealth of additional features that help you to write code:
- automatic indentation and bracket completion
- language specific hints and auto-completion
- support for inline documentation tools like Doxygen
- smart hyperlinks that allow you to jump between function calls and their implementation
- smart search and replace functionality (for correct refactoring)
- integrated compilation and trace-back for compiler errors and warnings
There are many IDEs available, and choosing one is like choosing your favourite text editor (mine are GNU nano and GNU Gedit). The IDE I use is called Qt Creator, and is part of the Qt GUI system tool-chain. It’s mainly meant to be used with C++, but also supports C and works with Fortran (I tried!). It also interfaces well with commonly used code configuration tools like CMake and ships with its own code configuration tool called QMake.
I don’t use Qt Creator (or an IDE for that matter) for all my projects, although I probably should. My view is that lightweight, terminal-based editors like nano (or vim, emacs…) are useful for small projects that often need to run on remote hardware, when running a full IDE is either impractical or simply impossible. Similarly, more basic GUI-based editors like gedit are useful when you need the flexibility of a GUI, but don’t rely on any of the other functionality offered by an IDE. That being said, when your project exceeds a certain size, having a fully functional IDE is a must.
Using an IDE protects you from a lot of small bugs that decrease your overall coding efficiency: misspelled key words, missing brackets, missing semi-colons… Auto-completion helps to type faster, and sometimes even helps you discover standard library functions or keywords that you didn’t know (this has happened to me on several occasions). Automatic formatting keeps your code clean and readable (although I would still recommend using an external formatting tool as well). Finally, integrated compilation helps you to find offending code much faster. These are only a few of the advantages an IDE offers.
Doxygen
Code documentation is incredibly important, as documentation is the only thing that can help other people (including your future self) to understand your code. It is also a huge elephant in the room called scientific coding (I can only really speak for computational astrophysics, but I can’t imagine common practice in other fields being very different). In this area, documentation is usually either minimal or even completely absent, or is added in a later stage of the development process, possible by someone other than the original code developer. As a result, most (public) scientific codes very much resemble black boxes, and it takes a huge effort and a lot of time to understand and extend them.
Doxygen is a tool that helps to motivate you to write documentation. In essence, it is a tool that parses your source code files and scans them for dedicated comment blocks. In C(++), the comment block for a function could look like this:
/**
 * @brief Short summary of what the function does.
 *
 * Detailed description of what the function does.
 *
 * @param a First function parameter.
 * @param b Second function parameter.
 * @return Return value of the function.
 */
In itself, this block is already useful, as it gives you a good way to think about function documentation. A function should perform a clear, well-defined task that should be easy to describe in a single line. Furthermore, it is very important to properly document input and output values for the function, as these are the variables a code user interacts with. Similar blocks exist for other code elements like classes, variables and even entire files.
The real power of doxygen however comes from the way it parses these blocks, and turns them into human-readable documentation. By default, doxygen generates documentation as a set of web pages. For the example comment block above, the output could look like this:
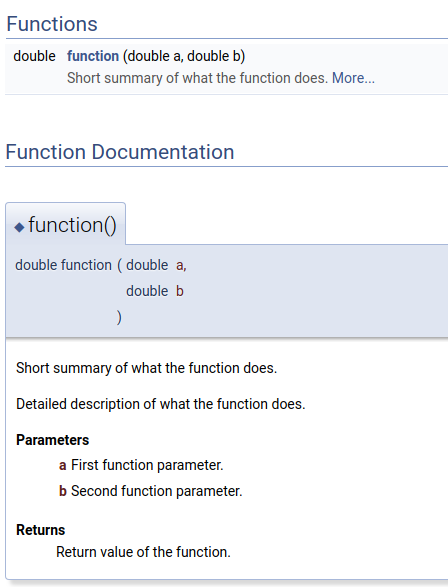
This layout can be customised in the doxygen configuration. A fully functional example of doxygen in action can be found on the CMacIonize documentation web page. Apart from web documentation, doxygen also supports PDF documentation and other text-based formats. The web page documentation is highly interactive, and makes it very easy to navigate through the code structure. This means that a new developer does not need to read through actual code to get a basic understanding of how the code works. Doxygen also automatically generates dependency diagrams for classes and functions, which are very helpful to understand the code design. It also offers support for LaTeX, making it possible to include mathematical symbols and formulae into your documentation.
The reason I really like doxygen is the way it integrates into Qt Creator. For most large projects, I automatically run doxygen as the final step in the compilation process, and I force doxygen to generate warnings for undocumented code or documentation errors (like misspelled variable names in parameter documentation). Qt Creator automatically captures these and allows you to access the offending bit of code (or documentation in this case) with a single click. I force myself to keep my compilation process warning free, so that I am forced to provide (minimal) documentation during the development process. This does not mean that my documentation is always as good as it could be or that is up-to-date (doxygen does not complain about a function parameter that changed meaning if you did not change its name), but it is still much better than not providing any documentation.
Code compilation and validation
CMake
When you have written a piece of code in a high-level language, you have to compile it into machine-readable code before you can execute it. This is done by a compiler. There are many compilers (and they are different for different programming languages), and often the compiler you use depends on the system you are running on.
The basic compilation process consists of two successive steps. In a first step, the compiler needs to process all source code files and create corresponding machine code files (these usually have a .o extension and are called object files). This is technically speaking the actual compilation step. The object files themselves are however not directly executable. To create an actual program that can be run, a second, linking step is required. During linking, a program called a linker puts together all object files that make up the program and also links them to external libraries in the system. Most compilers have their own linker, so that they can do both operations for you.
Compilation is generally more computationally expensive than linking (especially when you enable compiler optimisations), so that it makes sense to split these operations for large projects: you clearly don’t want to recompile source code files that did not change if you have hundreds of source code files and you only change a few at any given time. It does however make the compilation process quite complicated, as this means you need to run a separate compilation command for every single source code file, and then in the end combine all generated object files with an appropriate linker command (also including the correct path to all external libraries you use). And to be efficient, you furthermore need to do this in such a way that only the files that changed since the previous compilation are actually recompiled.
To help with this process, tools like GNU Make have been created. This tool reads a number of targets (usually program executables you want to create) from a Makefile, and contains the appropriate commands for the compilation and linking of all required files and libraries. The tool then figures out what the dependencies between these targets are, and makes sure only files that really need to be recompiled are compiled when you invoke the compilation process (through a single command, e.g. make).
Using a Makefile makes it much easier to recompile a program once you have figured out all required compilation commands. This means it is still up to you as a developer to create an appropriate Makefile and figure out what compilers you need to use and where all external libraries are located, which is very much system dependent. Some systems (like Microsoft Windows - an operating system that is quite often used outside my familiar field of astronomy) furthermore don’t support GNU Make natively, which means you need to use alternative build tools to compile on those systems.
To address these system dependency issues and make the compilation process more general and user-friendly, configuration tools like CMake were developed (GNU software often uses an alternative configuration tool called Automake). These tools introduce an additional step in the code development process, called configuration. During configuration, the configuration tool automatically gathers system information (e.g. available compilers, locations of system libraries, CPU architecture, available cores…) and from these generates an appropriate Makefile (or the alternative for Windows systems). The only required input is the list of targets that needs to be compiled, and a list of all the source code files and library names that need to be included in these targets. For CMake, this is provided in a file called CMakeLists.txt.
CMake is incredibly powerful and has many features (I should probably highlight those in a future blog post). But if you are only interested in basic compilation, it is quite simple. Consider for example a program, c.exe, that consists of two source code files, a.cpp and b.cpp. A minimal CMakeLists.txt file that compiles this program looks like this:
add_executable(c.exe a.cpp b.cpp)
Assuming the files a.cpp, b.cpp and CMakeLists.txt are in the same folder, the program can be configured and compiled as follows:
> cmake .
-- The C compiler identification is GNU 7.3.0
-- The CXX compiler identification is GNU 7.3.0
-- Check for working C compiler: /usr/bin/cc
-- Check for working C compiler: /usr/bin/cc -- works
-- Detecting C compiler ABI info
-- Detecting C compiler ABI info - done
-- Detecting C compile features
-- Detecting C compile features - done
-- Check for working CXX compiler: /usr/bin/c++
-- Check for working CXX compiler: /usr/bin/c++ -- works
-- Detecting CXX compiler ABI info
-- Detecting CXX compiler ABI info - done
-- Detecting CXX compile features
-- Detecting CXX compile features - done
-- Configuring done
-- Generating done
-- Build files have been written to: /path/to/folder
> make
[ 33%] Building CXX object CMakeFiles/c.exe.dir/a.cpp.o
[ 66%] Building CXX object CMakeFiles/c.exe.dir/b.cpp.o
[100%] Linking CXX executable c.exe
[100%] Built target c.exe
CMake automatically adds all necessary commands to generate the progress indicators. As you can see, no knowledge about compilers (or anything really) is required. You don’t even have to look at the Makefile (I wouldn’t, CMake tends to make it look very complicated).
Flags and compiler tools
Making sure your code compiles with various compilers on various systems can already help to discover bugs (some compilers are more pedantic than others). Most compilers also offer a lot of configurable options that can be activated by setting corresponding command line flags. These control the level of code optimisation, the type of hardware architecture you want to compile for, and can also activate some compile-time tools. A set of flags I really like (these are GCC compiler flags, but they also work for the Intel and Clang compilers) are:
-Wall -Werror
-Wall activates a large amount of compile-time warnings. These are messages the compiler generates while it is parsing the code, and they range from the presence of unused variables to the use of so-called shadow-variables: two variables with the same name that are accessible from the same bit of code (e.g. a variable that is declared inside a loop and that has the same name as a variable that was already defined before the loop). They correspond to issues that are not necessarily wrong, but that could point to a mistake (why would you declare a variable and not use it?). The list of warnings that is activated with -Wall depends on the compiler (e.g. the GNU compiler warning list), and you can also activate or deactivate individual warnings by using more specific flags.
Just as with doxygen, I prefer a clean compilation process, which means that I don’t want any warnings during the compilation process. The -Werror flag enforces this behaviour by turning every warning into an error, so that the compilation actually fails whenever a warning is encountered. This makes the compilation process a bit more pedantic than it should be (but still much better than when you use -Wpedantic; another available GNU compiler option), but I still feel I have won more time over the years from bugs I was able to resolve prematurely because of these warnings, than I have lost because of unnecessary warnings.
Compile-time tools are even more powerful than flags. Unfortunately, they are a lot more compiler dependent. The Clang compiler (and recent versions of the GCC compiler) include so called sanitizers. These are tools that are activated during compilation and that run during code execution, and that check for common bugs like memory leaks, out-of-bounds memory access, and even race conditions in a multi-threaded parallel context. Or in other words: many of the things that cause weird behaviour or segmentation faults during code execution.
Especially the address sanitizer (activated with the flags -fsanitize=address -fno-omit-frame-pointer) is useful, as I found it solves basically every segmentation fault I encountered since I started using this tool. The address sanitizer adds some additional buffer bytes to every memory allocation that is done by your code, and at run time checks that this buffer is (a) not overwritten (by an out-of-bounds memory write), (b) not read (by an out-of-bounds memory read), and (c) deallocated at the end of the program (not doing this causes a memory-leak). Whenever one of these issues is encountered, the code will crash with an error message that tells you exactly where in the code the memory block was allocated, and (in case of an out-of-bounds memory access), where the offending memory access operation occurred. This information is usually provided as an unreadable mess of debug symbols, but a separate tool like the Clang llvm-symbolizer or GNU addr2line can convert these to file names and line numbers that immediately lead you to the culprit.
Before I knew the address sanitizer, the only way I knew to resolve segmentation faults was using a debugger like gdb. Running your code through a debugger generally has a huge performance impact. For memory leaks, an alternative is using an external memory profiler like valgrind, which means an even bigger performance hit. Running the address sanitizer also has a non-negligible overhead, but this overhead is much smaller than that of any external tool, which generally results in a much faster debugging process for memory related issues (which I find the most tricky issues to resolve).
Debuggers
Most programmers will tell you that a debugger is a very important programming tool. It is an external program through which you run your code, and that allows you to step through your code, line by line, and at run-time inspect the values of variables and check the state of the program. I don’t necessarily disagree that debuggers are useful (I used them a lot during the first years of my PhD), but I do have to say I use them a lot less nowadays than I used to. There are two important reasons for this.
First of all, tools like the address sanitizer provide a much faster and better way to debug memory issues, which constitute the majority of the bugs I encounter nowadays. They cause less of a performance hit and are therefore faster (useful to debug large simulations), and their output is usually better, as they immediately link out-of-bounds access operations to the corresponding allocation, which you would otherwise need to do yourself.
Secondly, I no longer use a debugger to inspect code variables either. Most of my code development nowadays is test-driven, which means that I write small bits of code and then extensively test them before moving on. This makes it less likely that weird variable changes cause bugs. To check that variables have sensible variables (e.g. make sure that positive variables are actually positive or that variables are not NaN), I prefer using assertions. Assertions are macros (which you can think of as instructions that are executed by the compiler during compilation) that explicitly check a condition and crash the code if the condition is not met. C and C++ have an assert macro as part of the standard library. A minimal example that uses this would be:
#include <cassert> // use <assert.h> for C

int main(int argc, char **argv) {
  const double a = 2.; // assign a value to variable a
  assert(a == 2.); // check the value of a, this will pass
  assert(a == 3.); // check the value of a, this will fail
  return 0; // we never reach this line
}
This default macro will produce a stack trace similar to the address sanitizer that allows you to find the line in the code that crashed:
> ./assert.exe
assert.exe: assert.cpp:6: int main(int, char**): Assertion `a == 3.' failed.
Aborted (core dumped)
It however provides no information about why the line in the code crashed exactly. For this reason, I prefer to define my own assertion macros that produce additional output, like the values of variables that were used in the computation prior to the assertion condition.
The advantage of using macros is that they are parsed by the compiler at compile-time. This means that the compiler, whenever it encounters an assertion macro, jumps to the bit of code where that macro is defined and then literally replaces the line with the macro call with that definition (it will substitute macro parameters with the correct variable names in the process). The default assertion macro for example could be defined like this (it is not, since it contains additional code to produce the stack trace):
#define assert(condition) \
  if(!(condition)) {      \
    exit(-1);             \
  }
In this case, the compiler will turn the example minimal code above into
int main(int argc, char **argv) {
  const double a = 2.;
  if(!(a == 2.)){
    exit(-1);
  }
  if(!(a == 3.)){
    exit(-1);
  }
  return 0;
}
Clearly, the presence of these macros adds a lot of additional code that will decrease the performance of the program. This makes sense: we are actively checking the values of our variables at run-time. However, sometimes we don’t want to take this performance hit. Since macros are parsed by the compiler, it is very easy to switch them off: we simply need to overwrite the definition of the assertion macro (#define assert(condition) ). The C(++) standard library assertion macro does this: it is automatically deactivated when you enable optimisations during compilation.
To summarise: assertion macros are additional lines of code that explicitly check your variables at run-time, but only if you want to activate them. Since they are compiled into the code, they are much faster than running an external debugger. Additionally, I find their presence in a code quite reassuring. Consider this simple example function:
double divide(const double a, const double b) {
  assert(a == a); // check that a is not NaN
  assert(b == b); // check that b is not NaN
  assert(b != 0.); // check that b is not 0
  const double result = a / b;
  assert(result == result); // check that result is not NaN
  return result;
}
If all the assertions in this bit of code are executed, there is not much that can go wrong when calling this function that would not be flagged and cause your code to crash. So if you still find NaN values shortly after executing this function, your bug is not in this bit of code, but in the bit between the function call and the point where you crash. That narrows it down quite a lot.
Note that the
NaNcheck above works because the C(++) standard dictates that a condition containing aNaNvalue should always result infalse. So aNaNvariable will not be equal to itself.
It feels a bit strange to spend a whole section titled debuggers talking about alternatives for debuggers. So let me conclude by saying that a debugger like gdb is still very useful in some cases. The reason I don’t use a debugger very often is because I mainly work with my own codes that I know through-and-through or with codes that have builtin assertions and/or a design that makes it much easier to find bugs by inspecting the code output. If you start your scientific computing career using somebody else’s legacy code, chances are a debugger will be the only way for you to figure out what is actually happening and causing your specific bug or unexpected behaviour.
Code style and storage
clang-format
Properly formatting your code significantly improves its readability. Compare these two examples (in terms of readability; I am aware that the code itself could be restructured in a more efficient way):
double a = 5.;
for(int i = 0; i < 100; ++i){
if(i > 50){
if(i < 70) a = 2.;
} else {
if(i < 20){ a =3.; } else { a=2.;}
}}
double a = 5.;
for(int i = 0; i < 100; ++i){
  if(i > 50){
    if(i < 70)
      a = 2.;
  } else {
    if(i < 20){
      a = 3.;
    } else {
      a = 2.;
    }
  }
}
While both pieces of code do exactly the same, and the first one is significantly shorter (good if you care about your code golf handicap: performing an operation in as little lines of code as possible), I think there are a few things in the first bit of code that might make you frown.
IDEs contain functionality to help your properly format your code, so code like the first example is very rare in practice. There are however a lot of possible style choices:
- do you indent using tabs or spaces? How many spaces do you indent?
- do you keep opening brackets on the same line as the function declaration/if condition/ loop condition they belong to, or do you put them on a new line?
- do you impose a maximum line length, and if so, what is the limit? How do you deal with lines that exceed this limit?
- how do you format mathematical expressions?
These are pretty much personal choices (although it is generally impractical not to impose a maximal line length; a 300 characters long code line does not fit on a standard monitor, let alone on a terminal window with a default line length of 80 characters). This also means that different people have (sometimes very strong) different preferences. And that can cause problems.
Consider a large code project in which you are only one of a few developers. Since all of you are working on the same code, there will inevitably be situations in which two or more of you will need to edit the same file at the same time, but on different computers. No problem, since repository systems like git make this very easy for you, and in many cases automatically merge different changes to the same file.
Now consider the case where you (or in this case: me) have a very strong preference for multi-line if conditions, even for short conditions. So
if(i > 2){
  a = 2.;
} else {
  a = 3.;
}
rather than
if(i > 2){ a = 2.; } else { a = 3.; }
The file you are currently editing was originally written by your colleague Donald, who is a big code golfer with a strong preference for the latter, and hence contains a number (let’s say 5) of single line conditions. You didn’t notice (or you really can’t stand these single-liners; true story!) and let your IDE reformat the entire file to your liking. Now all of a sudden your version of the file will not only contain all your actual code edits, but also a lot of non-edits: single-line conditions that were turned into their multi-line equivalent. git correctly notices that these things changed, and will change the shared repository.
Now, two (or three) things can happen: (a) your code change history will be cluttered with formatting changes: while you only really added 4 lines of code, 25 additional lines changed because you replaced 5 single-line conditions with 5 multi-line conditions each, and (b) git will go in conflict mode the next time Donald tries to push his changes to the file, since he decided to change something in 2 of the 5 single-line conditions, and now both of you changed the same lines of the same file simultaneously (and (c) Donald will get angry, he really likes his code golf). While all of this is very easy to resolve, it could also be very easily avoided (and you wouldn’t have as many childish fights with Donald) if your team agreed on a code style. And then rigorously stuck to it.
This is were clang-format comes into play. This tool is part of the Clang compiler tool-set and is very similar to the formatting functionality of an IDE, as it parses all your code files and then formats them according to a (predefined) style. If all members of your team use the same version of the tool, it guarantees a consistent formatting (although I found this not to be true on a few rare occasions). So even if Donald methodically code golfs all your multi-liners into single-liners, the tool will only produce one style of if conditions (according to who won the fight during the project style meeting). So now the only changes that will show up in your git history are actual useful changes. And the only conflicts will be caused by real code conflicts (or, as experience teaches, because git is not very good at interpreting changes inside comment blocks).
In short: if you are serious about collaborating on a code, you should definitely address code styling early on and agree on a code style. And then use clang-format to enforce it before you push any changes to the shared repository. It will make your life a lot easier. And if the team decides to adopt a style you don’t like, well… you get used to it eventually.
git
Of all the tools I have discussed so far, this last one is definitely the most important one, as it concerns where your code actually lives (and more importantly, whether or not it actually still lives). When you start writing a new code, you will probably be working on a computer and store your very first code file somewhere in the local file system. However, it really shouldn’t stay just there for very long. Computers sometimes crash, hard disks break, and your hard work might very easily get lost. So you should definitely store a backup of your code on another disk, a remote file system, or in the cloud (and you should really always do this with any file you need that can not be easily regenerated).
Having a backup alone however only gives you one version of the code you can restore if things go awfully wrong. If your code is perfect (I’m sure it is), this is all you want. But sometimes things do go wrong when you write new code, and you can accidentally introduce bugs that were not present before. Or you can do an awful lot of work with a code and publish results based on it, and then change it in such a way that those results can no longer be accurately reproduced (evidently because they are so much better now). Wouldn’t it be nice if you could somehow also keep a backup of older versions of your code?
Versioning is exactly that: keeping a structured overview of older versions of a code. In its most simple form, versioning is done by storing the state of your code at a certain point in time in a dedicated folder, with some additional information that tells you exactly what version this is and what it was used for. However, keeping your version history like this requires a lot of manual intervention, and introduces quite a lot of overhead: it is very likely that only a small part of your code changes in between different versions, so why would you backup all files all the time? Also: how do you decide how often to take a backup like this?
Repository systems provide a next level in versioning that addresses these issues. In essence, a repository is a large database of code files, that not only correspond to the code files that make up your project, but also all past versions of these individual files. The latest version of your code is not kept in terms of the actual files that make up this version, but is stored in an abstract way, as a tree. This tree is nothing more than a list of database entries, that together make up the current state of the code. If a file was created and then never changed afterwards, there will only be one entry for this file in the repository database, and all versions of the code will have a tree that links to that single entry. Most files will have more interesting histories, and will have many entries in the database. Every version of the code will have a tree that links to the appropriate entry for that file.
Apart from keeping track of files, the repository database also keeps track of when each file changed the last time (and who changed it). Just as in naive versioning, this requires manual intervention: you, as a code developer, issue a command to the repository system that takes a snapshot of the code as it is at that time and generates new database entries for files that changed. This is called a commit. A commit is always linked to one specific user of the repository system and a specific date, and should be provided with an accompanying description of the changes that were made since the last commit. The repository system then assigns a unique tag to the commit, that corresponds to the state of the code at that time (or hence the corresponding file tree).
This is just a simple outline of what a repository system does, which skips over many of the complex operations that are possible within professional repository systems like git. It also does not really address an important question: when do you need to store the state of the code and make a commit? When using naive, manual versioning, you clearly want to keep the number of code versions relatively small, as all the copies of unchanged files will quickly clutter your file system. When using a repository system,this is less of a problem, since only files that changed (or even just the changes that were made) are recorded. Still, it seems pretty impractical to make a commit for every single line of code that changed. An approach I like to use is description based: if the changes you made still fit in a simple description (e.g. implemented function A or changed A to B), a single commit usually suffices. If you implemented a function in file A and another function in file B and the two files are totally unrelated, you should probably put them in separate commits. Note that git (and other repository systems) also have advanced features that allow you to create isolated branches of specific code versions that can then later be merged back into the original, in which case it is possible to squash many small commits into a single commit. I should probably write another blog post specifically focusing on git to tell you more about that.
Another thing I didn’t mention yet is where the repository database lives exactly. This depends on the repository system. Systems like subversion work with a single central database that can be stored on a server but also on your local computer, and all commits are made directly to this central database. git and mercurial use a more advanced, two-step approach, whereby a central database lives on a remote server (although in principle it could still live on your local computer). To access the code, you first have to clone this repository, i.e. you literally create a copy of the database on your local computer. Commits are made to this local copy, and then periodically synced with the central database in a so called push operation (if you already have a local copy of the database, you can sync this with the remote database with a pull operation). The advantage of this two-tiered approach is that you can still make commits if you have no access to the remote repository (because you are, just like me right now, on a bus). This approach also makes it easier to resolve conflicts when multiple people make independent changes to the same file in between commits.
There are a number of online services that offer free (and/or paid) repository servers, the most famous ones probably being Github and Bitbucket. It is important to note that these services are not connected to the underlying repository system: git works on its own as a repository system without explicitly requiring an online repository.
Professional astronomer.